LLM 스터디 3주차 - vLLM은 왜 빠른가 — PagedAttention과 연속 배칭 직접 재현하기

2주차 실습들은 서빙 시스템을 어떻게 구성하는지를 다뤘다. 이번에는 질문이 안쪽으로 향한다. vLLM은 정확히 무엇 때문에 빠른가.
CPU만 있는 4GB VM에서 SmolLM-135M을 8단계로 굴린다. HuggingFace 베이스라인을 재고, vLLM과 비교하고, KV 캐시가 낭비되는 과정을 숫자로 본 뒤 PagedAttention이 그것을 어떻게 되돌리는지 확인한다.
결론부터 말하면 단일 요청에서 vLLM은 1.1배밖에 빠르지 않다. 진짜 차이는 동시 사용자가 붙을 때 나온다. 이 글의 8단계는 그 격차가 어디서 오는지를 따라가는 순서다.
1. 실습 환경
GPU가 없다. vLLM의 CPU 빌드를 쓰고, 4GB 메모리 제한 때문에 엔진을 in-process로 띄운다.
| 항목 | 값 |
|---|---|
| 모델 | HuggingFaceTB/SmolLM-135M (135M 파라미터) |
| vLLM | 0.27.1+cpu (CPU 빌드) |
| torch / transformers | 2.13.0+cpu / 5.15.0 |
| gradio / aiohttp | 5.50.0 / 3.14.3 |
| 실행 환경 | CPU 전용, 메모리 4GB 제한 |
max_model_len | 128 |
| KV 캐시 | 128MB (kv_cache_memory_bytes=134217728) |
제약이 설정을 강제한다. 4GB VM에서 vLLM 기본값인 멀티프로세스 모드는 파이썬 프로세스를 2개 더 띄우고 각각 1GB를 넘게 쓴다. 그래서 in-process로 돌린다.
# CPU 전용 실행 설정.
# VLLM_ENABLE_V1_MULTIPROCESSING=0 으로 엔진을 in-process 로 돌린다.
# 기본 멀티프로세스 모드는 별도 파이썬 프로세스 2개가 각각 1GB 넘게 쓴다.
# VLLM_CPU_KVCACHE_SPACE 는 일부러 비운다 — 설정하면 kv_cache_memory_bytes 를
# 덮어쓰고 GiB 단위 정수만 받는다.
os.environ["VLLM_TARGET_DEVICE"] = "cpu"
os.environ["VLLM_ENABLE_V1_MULTIPROCESSING"] = "0"
os.environ.pop("VLLM_CPU_KVCACHE_SPACE", None)
os.environ["TORCHDYNAMO_DISABLE"] = "1"

# 128MB KV 캐시 — max_model_len=128 기준 SmolLM-135M 시퀀스를 약 43개 담는다
# (토큰당 KV 약 22.5KB). 작게 잡은 이유는 vLLM 기동 검사가 파드의 page cache
# (모델 다운로드분)를 사용 중으로 계산해서, 4GB VM에 몇백 MB만 남은 것으로 보기 때문이다.
KV_CACHE_BYTES = 128 * 1024 * 1024
환경 검증부터 통과시킨다.
root@controlplane ~/code ➜ source /root/venv/bin/activateroot@controlplane ~/code ➜ python /root/code/verify_environment.py=================================================================vLLM Explained Lab - Environment Verification=================================================================[1/5] Checking Python virtual environment... PASS - Virtual environment found at /root/venv[2/5] Checking required packages... PASS - torch 2.13.0+cpu PASS - transformers 5.15.0[3/5] Checking vLLM installation... PASS - vllm 0.27.1+cpu (CPU build)[4/5] Checking additional packages... PASS - gradio 5.50.0 PASS - aiohttp 3.14.3 PASS - requests 2.34.2[5/5] Downloading SmolLM-135M model... Downloading tokenizer for HuggingFaceTB/SmolLM-135M...config.json: 100%|████████████| 724/724 [00:00<00:00, 5.37MB/s]vocab.json: 100%|███████████| 801k/801k [00:00<00:00, 91.5MB/s]tokenizer.json: 100%|██████| 2.10M/2.10M [00:00<00:00, 242MB/s] Downloading model for HuggingFaceTB/SmolLM-135M...model.safetensors: reconstructing file: 100%|█| 538MB / 538MBLoading weights: 100%|█████| 272/272 [00:00<00:00, 1576.86it/s] PASS - Model downloaded in 6.8s Model size: 135M parameters Running quick test generation... Test output: Hello, world! PASS - Model generates text successfully=================================================================ENVIRONMENT CHECK: 5/5 passed=================================================================All checks passed! Your environment is ready.2. Task 1 — HuggingFace 베이스라인
비교 기준을 먼저 만든다. transformers로 모델을 올리고 50토큰을 생성하며 시간을 잰다.
model = AutoModelForCausalLM.from_pretrained(model_name)
tokenizer = AutoTokenizer.from_pretrained(model_name)
inputs = tokenizer(prompt, return_tensors="pt")

start_time = time.time()
outputs = model.generate(
    **inputs,
    max_new_tokens=50,
    do_sample=True,
    temperature=0.7,
)
end_time = time.time()

generated_tokens = outputs.shape[1] - inputs["input_ids"].shape[1]
tokens_per_second = generated_tokens / (end_time - start_time)root@controlplane ~/code ➜ python /root/code/task_1_hf_baseline.py=================================================================Task 1: Naive HuggingFace Inference - The Baseline=================================================================Model: HuggingFaceTB/SmolLM-135MPrompt: "Explain what a large language model is in simple terms."-----------------------------------------------------------------Loading model with HuggingFace transformers...Loading weights: 100%|█████| 272/272 [00:00<00:00, 2441.55it/s]Model loaded successfully.Generating with HuggingFace transformers...--- RESULTS ---Generated tokens: 50Total time: 4.77 secondsTokens per second: 10.5 tok/s=================================================================KEY INSIGHT:- This is SINGLE-REQUEST performance- There is no batching - one request at a time- Under load with multiple users, requests would queue up=================================================================10.5 tok/s가 기준선이다. 여기서 중요한 것은 숫자 자체가 아니라 성격이다. model.generate()는 요청 하나를 처음부터 끝까지 처리하고, 그동안 다른 요청은 그냥 기다린다.
3. Task 2 — vLLM 오프라인 추론
같은 모델, 같은 프롬프트를 vLLM으로 돌린다. 코드는 오히려 짧아진다.
from vllm import LLM, SamplingParams

# enforce_eager=True 는 torch.compile 을 건너뛰어 CPU에서 메모리를 아낀다
llm = LLM(model=model_name, max_model_len=128, enforce_eager=True,
          kv_cache_memory_bytes=KV_CACHE_BYTES)

sampling_params = SamplingParams(temperature=0.7, max_tokens=50)
outputs = llm.generate([prompt], sampling_params)

generated_tokens = len(outputs[0].outputs[0].token_ids)
tokens_per_second = generated_tokens / total_timeroot@controlplane ~/code ➜ python /root/code/task_2_vllm_inference.py=================================================================Task 2: vLLM Offline Inference - See the Difference=================================================================INFO [importing.py:53] Triton is installed but 0 active driver(s) found (expected 1). Disabling Triton.Initializing vLLM engine...INFO [api_utils.py:273] non-default args: {'max_model_len': 128, 'kv_cache_memory_bytes': 134217728, 'enforce_eager': True, 'model': 'HuggingFaceTB/SmolLM-135M'}INFO [model.py:645] Resolved architecture: LlamaForCausalLMINFO [model.py:1883] Using max model len 128INFO [scheduler.py:242] Chunked prefill is enabled with max_num_batched_tokens=4096.INFO [core.py:121] Initializing a V1 LLM engine (v0.27.1) ... device_config=cpu, enable_prefix_caching=True, enable_chunked_prefill=True ...INFO [cpu_model_runner.py:131] Starting to load model HuggingFaceTB/SmolLM-135M...INFO [weight_utils.py:867] Filesystem type for checkpoints: OVERLAY. Checkpoint size: 0.50 GiB. Available RAM: 0.36 GiB.Loading safetensors checkpoint shards: 100% Completed | 1/1 [00:00<00:00, 3.55it/s]INFO [default_loader.py:430] Loading weights took 0.31 secondsINFO [cpu_worker.py:248] Explicitly set (0.12/3.73) GiB for KV cache on node 0.INFO [kv_cache_utils.py:2235] GPU KV cache size: 5,760 tokensINFO [kv_cache_utils.py:2236] Maximum concurrency for 128 tokens per request: 45.00xINFO [core.py:355] init engine (profile, create kv cache, warmup model) took 0.10 svLLM engine ready.Generating with vLLM...Processed prompts: 100%|█| 1/1 [00:04<00:00, 4.19s/it, est. speed input: 2.63 toks/s--- vLLM RESULTS ---Generated tokens: 50Total time: 4.19 secondsTokens per second: 11.9 tok/s--- COMPARISON: HuggingFace vs vLLM ---Metric HuggingFace vLLM----------------------------------------------Tokens/sec 10.5 11.9Total time 4.77s 4.19svLLM is 1.1x faster in tokens/sec=================================================================KEY INSIGHT:- vLLM optimizes inference even for single requests- The REAL advantage is under concurrent load (Task 6)=================================================================1.1배다. 엔진을 통째로 바꿨는데 단일 요청 속도는 거의 그대로다. vLLM을 “빠른 추론 엔진"으로만 이해하면 이 결과가 설명되지 않는다.
기동 로그에 답의 실마리가 있다. GPU KV cache size: 5,760 tokens와 Maximum concurrency for 128 tokens per request: 45.00x다. vLLM이 최적화하는 대상은 한 요청의 속도가 아니라 동시에 몇 개를 담을 수 있는가이고, 그 용량은 KV 캐시가 정한다.
4. Task 3 — KV 캐시는 어떻게 낭비되는가
전통적인 방식은 요청마다 최대 길이를 미리 잡는다. 실제로 몇 토큰을 쓸지 모르니 최악의 경우를 예약한다.
max_model_len=512 기준으로 길이가 제각각인 요청 5개를 시뮬레이션한다.
root@controlplane ~/code ➜ python /root/code/task_3_kv_cache_problem.py=================================================================Task 3: The KV Cache Problem - Why Memory Matters=================================================================Max sequence length (pre-allocated per request): 512Number of concurrent requests: 5--- SIMULATING CONTIGUOUS ALLOCATION ---(Each request gets 512 token slots, regardless of actual usage) Request 1 (Short question): [####..............................................] 45/512 used (91.2% wasted) Request 2 (Medium paragraph): [############......................................] 128/512 used (75.0% wasted) Request 3 (Quick greeting): [##................................................] 23/512 used (95.5% wasted) Request 4 (Long document): [#########################.........................] 256/512 used (50.0% wasted) Request 5 (Code snippet): [######............................................] 67/512 used (86.9% wasted)--- SUMMARY ---Total allocated: 2560 token slotsTotal actually used: 519 token slotsMemory utilization: 20.3%Overall waste: 79.7%--- CONCURRENT USER IMPACT --- With 10000 total memory slots: - Contiguous allocation: 19 concurrent users max - Ideal (no waste): 97 concurrent users max - You are serving 19x fewer users than possible!=================================================================2,560슬롯을 잡아 519슬롯을 썼다. 활용률 20.3%. 짧은 인사 한 줄이 512칸을 통째로 예약해 95.5%를 버린다.
이 낭비가 그대로 동시 사용자 수로 환산된다. 같은 메모리로 19명 대 97명이다. 속도가 아니라 수용 인원의 문제다.
5. Task 4 — PagedAttention
vLLM의 해법은 OS의 가상 메모리 페이징을 그대로 가져온 것이다. 큰 덩어리를 미리 잡는 대신 16토큰짜리 작은 페이지를 필요할 때마다 준다.
root@controlplane ~/code ➜ python /root/code/task_4_paged_attention.py=================================================================Task 4: PagedAttention - vLLM's Solution=================================================================Page size: 16 tokens per pageContiguous allocation: 512 tokens per request (worst-case)--- PAGED ALLOCATION (like vLLM's PagedAttention) --- Request 1: 45 tokens -> 3 pages (48 slots) Pages: [##|##|##] waste: 6.2% Request 2: 128 tokens -> 8 pages (128 slots) Pages: [##|##|##|##|##|##|##|##] waste: 0.0% Request 3: 23 tokens -> 2 pages (32 slots) Pages: [##|##] waste: 28.1% Request 4: 256 tokens -> 16 pages (256 slots) Pages: [##|##|##|##|##|##|##|##|##|##|##|##|##|##|##|##] waste: 0.0% Request 5: 67 tokens -> 5 pages (80 slots) Pages: [##|##|##|##|##] waste: 16.2%--- SIDE-BY-SIDE COMPARISON ---Method Total Allocated Total Used Utilization---------------------------------------------------------Contiguous 2560 slots 519 slots 20.3%Paged 544 slots 519 slots 95.4%Memory saved: 2016 slots (4.7x less memory)--- CONCURRENT USER IMPACT --- With 10000 total memory slots: - Contiguous: 19 concurrent users - Paged: 92 concurrent users - Improvement: 4.8x more users!=================================================================활용률이 20.3%에서 95.4%로 올라간다. 같은 요청 5개를 2,560슬롯이 아니라 544슬롯으로 담는다.
남은 낭비는 페이지 경계에서만 생긴다. 23토큰 요청이 2페이지(32슬롯)를 받아 28.1%를 버리는 식인데, 버리는 양이 페이지 크기 이하로 묶인다는 점이 핵심이다. 512칸을 예약하고 23칸만 쓰던 것과는 규모가 다르다.
OS 비유가 정확히 들어맞는다. OS는 RAM을 4KB 페이지로 나눠 프로세스에 필요할 때 준다. vLLM은 KV 캐시를 토큰 단위 페이지로 나눠 생성이 진행되는 만큼만 준다.
6. Task 5 — OpenAI 호환 API 서버
여기서 오프라인 추론을 벗어난다. vLLM은 OpenAI 호환 API 서버를 기본 제공한다.
python -m vllm.entrypoints.openai.api_server \
--model HuggingFaceTB/SmolLM-135M --port 8000root@controlplane ~/code ➜ python /root/code/task_5_api_server.py=================================================================Task 5: vLLM OpenAI-Compatible API Server=================================================================Model: HuggingFaceTB/SmolLM-135MServer URL: http://localhost:8000Prompt: "What is inference in machine learning?"-----------------------------------------------------------------Starting vLLM server (this may take a moment)... Server process started (PID: 6969) Waiting for server to be ready... Server is ready! (18s)--- SENDING REQUEST ---Endpoint: http://localhost:8000/v1/completions--- RESPONSE ---Response:Inference is a component of machine learning that allows an algorithm to makepredictions based on data. It is a type of optimization problem in machinelearning that involves finding the best parameLatency: 3.83sPrompt tokens: 7Completion tokens: 50--- API DETAILS ---Format: OpenAI-compatible (drop-in replacement)Auth: No API key needed (local server)=================================================================KEY INSIGHT:- Any app using the OpenAI SDK works with vLLM - zero code changes=================================================================엔드포인트가 /v1/completions다. OpenAI SDK를 쓰는 애플리케이션이라면 base URL만 바꾸면 그대로 붙는다. SageMaker 편에서 본 /invocations 계약과 달리, 여기서는 이미 널리 쓰이는 스키마를 그대로 구현한다.
7. Task 6 — 동시 사용자를 붙인다
앞의 여섯 단계가 이 지점을 향한다. 동시 요청 수를 1 → 5 → 10 → 20으로 올리며 처리량을 잰다.
async def send_request(session, url, model, prompt, max_tokens=50):
    async with session.post(url, json={...}) as resp:
        data = await resp.json()
        return data

async def run_load_test(url, model, prompts, num_concurrent):
    async with aiohttp.ClientSession() as session:
        tasks = [send_request(session, url, model, p) for p in prompts]
        results = await asyncio.gather(*tasks)
return resultsroot@controlplane ~/code ➜ python /root/code/task_6_multi_user_load.py=================================================================Task 6: Multi-User Throughput Under Load=================================================================Load test plan: [1, 5, 10, 20] concurrent usersEach user sends 1 request with max_tokens=50 Testing with 1 concurrent user(s)... done (13.0 tok/s, 3.85s avg latency) Testing with 5 concurrent user(s)... done (53.3 tok/s, 4.67s avg latency) Testing with 10 concurrent user(s)... done (96.2 tok/s, 5.18s avg latency) Testing with 20 concurrent user(s)... done (163.4 tok/s, 6.11s avg latency)--- LOAD TEST RESULTS --- Users Total Tokens Time (s) Throughput Avg Latency Success------------------------------------------------------------------ 1 50 3.85s 13.0 tok/s 3.85s 100% 5 250 4.69s 53.3 tok/s 4.67s 100% 10 500 5.20s 96.2 tok/s 5.18s 100% 20 1000 6.12s 163.4 tok/s 6.11s 100%--- SCALING ANALYSIS --- Baseline (1 user): 13.0 tok/s Peak (20 users): 163.4 tok/s Scaling factor: 12.6x throughput improvement=================================================================KEY INSIGHT:- Throughput SCALES with concurrent users- vLLM uses continuous batching - does not wait for batch to fill- Per-request latency increases but total throughput improves=================================================================동시성 20배에 처리량 12.6배다. Task 2에서 1.1배였던 그 엔진이다.
| 동시 사용자 | 처리량 | 평균 지연 | 사용자당 실효 |
|---|---|---|---|
| 1 | 13.0 tok/s | 3.85s | 13.0 |
| 5 | 53.3 tok/s | 4.67s | 10.7 |
| 10 | 96.2 tok/s | 5.18s | 9.6 |
| 20 | 163.4 tok/s | 6.11s | 8.2 |
두 축이 반대로 움직인다. 처리량은 12.6배 늘지만 개인이 체감하는 지연은 3.85초에서 6.11초로 늘어난다. 사용자당 실효 속도는 13.0에서 8.2로 떨어진다.
이것이 서빙에서의 트레이드오프다. 20명이 각자 순서를 기다리면 마지막 사람은 77초를 기다리지만, 함께 배치로 묶이면 6.11초에 끝난다. 개인 지연을 1.6배 희생해 전체를 12.6배 처리한다.
가능한 이유는 두 가지가 겹쳐서다. continuous batching은 배치가 다 찰 때까지 기다리지 않고 도착하는 대로 진행 중인 배치에 끼워 넣는다. 그리고 그렇게 끼워 넣을 자리를 만들어 주는 것이 앞에서 본 PagedAttention이다.
8. Task 7 — 파라미터 튜닝
같은 서버를 설정만 바꿔 세 번 벤치마크한다. 동시 요청은 10개로 고정한다.
root@controlplane ~/code ➜ python /root/code/task_7_tuning.py=================================================================Task 7: Tuning vLLM Parameters for Production=================================================================Benchmark: 10 concurrent requests per config-------------------------------------------------------------------- CONFIG A: Default --- max_model_len=128, max_num_seqs=256, swap_space=1GB Result: 95.2 tok/s, 5.12s avg latency--- CONFIG B: Shorter Context --- max_model_len=64, max_num_seqs=256, swap_space=1GB Result: 101.9 tok/s, 4.90s avg latency--- CONFIG C: Limited Concurrency --- max_model_len=64, max_num_seqs=8, swap_space=1GB Result: 53.6 tok/s, 6.01s avg latency--- CONFIGURATION COMPARISON ---Config max_model_len max_num_seqs Throughput Latency------------------------------------------------------------------------A: Default 128 256 95.2 tok/s 5.12sB: Shorter Context 64 256 101.9 tok/s 4.90sC: Limited Concurrency 64 8 53.6 tok/s 6.01s=================================================================세 결과가 서로 다른 것을 말한다.
B가 A보다 빠르다. max_model_len을 128에서 64로 줄였을 뿐인데 처리량이 7% 오르고 지연도 줄었다. 요청당 KV 캐시 예산이 절반이 되면서 같은 메모리에 더 많은 시퀀스가 들어갔기 때문이다.
C가 결정적이다. B와 컨텍스트 길이는 같은데 max_num_seqs를 256에서 8로 줄이자 처리량이 101.9에서 53.6으로 반토막 났다. 동시 요청 10개 중 8개만 배치에 들어가고 나머지는 큐에서 기다린다. Task 6에서 본 배칭 효과를 설정 하나로 꺼 버린 셈이다.
정리하면 max_model_len은 요청당 메모리를, max_num_seqs는 배치에 들어갈 수 있는 시퀀스 수를 정한다. 둘 다 결국 KV 캐시 예산을 나누는 손잡이이고, 이는 Ray Serve 편에서 gpu_memory_utilization과 max_model_len을 다뤘던 것과 같은 구조다.
9. Task 8 — 모니터링 대시보드
마지막은 Gradio로 지표를 띄운다. 앞에서 잰 tok/s와 지연을 실시간으로 보는 화면이다.
root@controlplane ~/code ➜ python /root/code/task_8_dashboard.py=================================================================Task 8: Production Monitoring Dashboard (Capstone)=================================================================Server: http://localhost:8000 (running)Dashboard will be available at: http://localhost:7860-----------------------------------------------------------------Testing live metrics against the vLLM server...Building Gradio dashboard...Task 8 Complete!Launching dashboard on port 7860...* Running on local URL: http://0.0.0.0:7860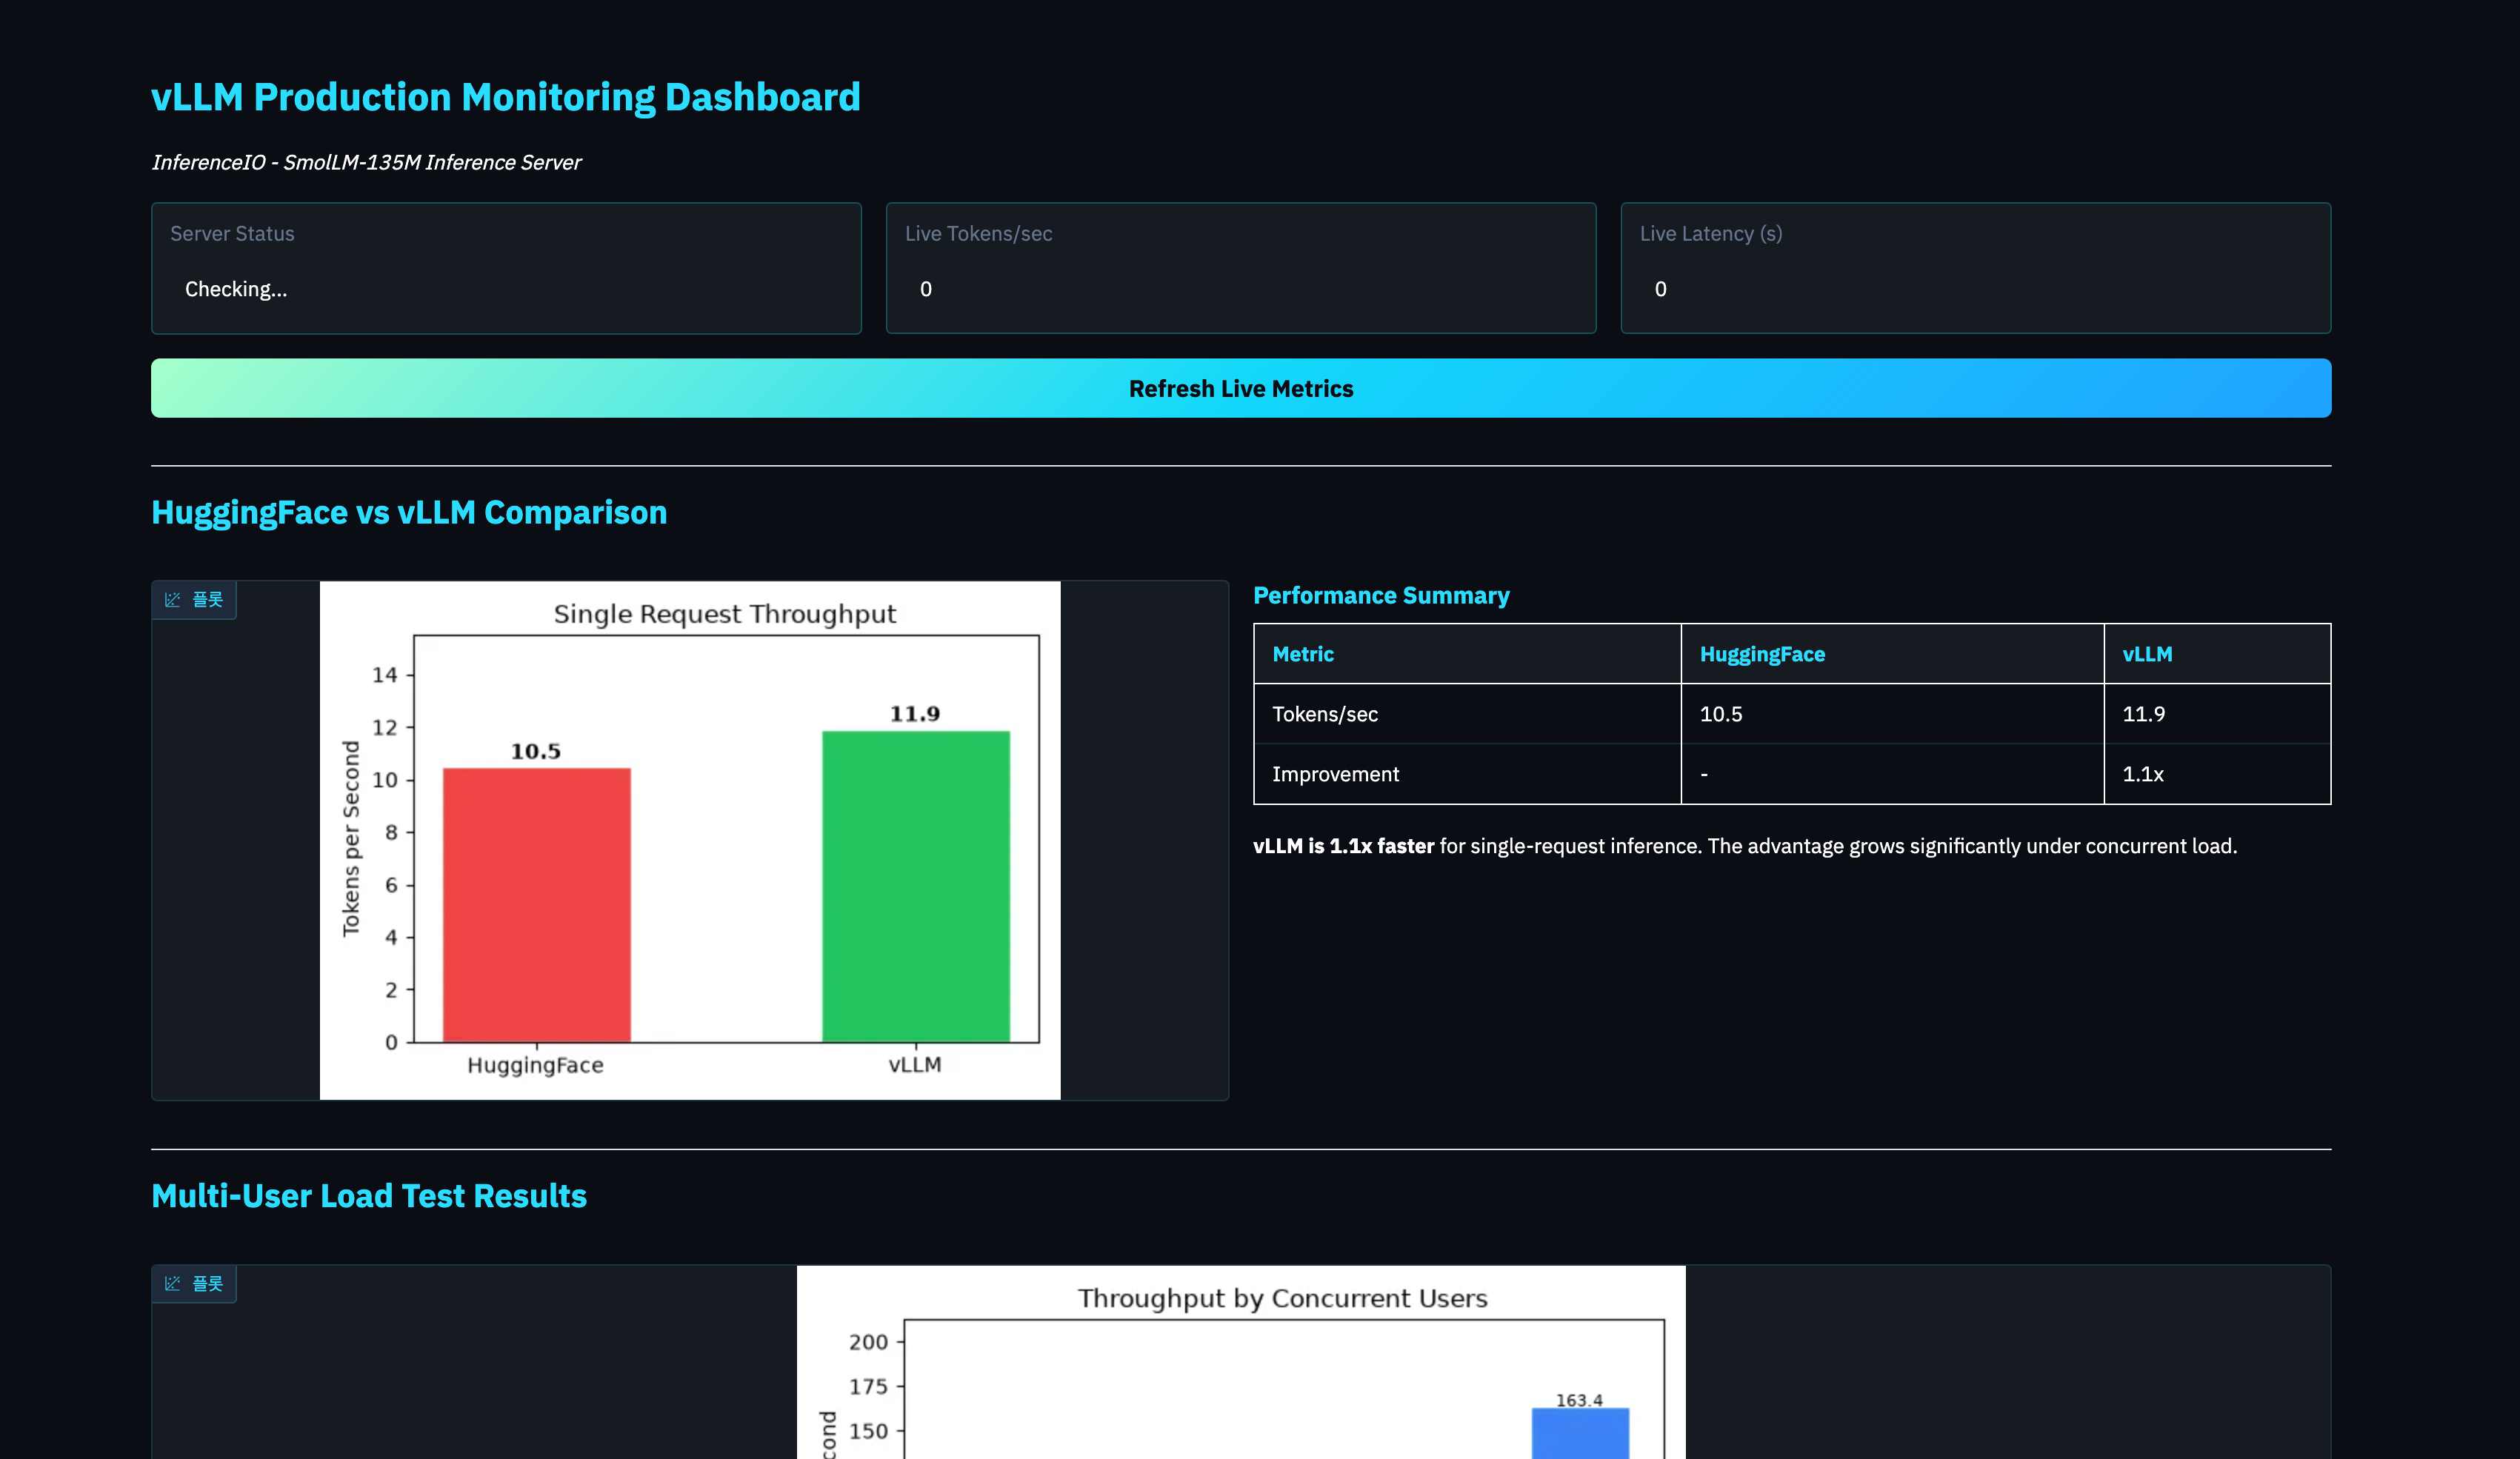
프로덕션에서는 Gradio 대신 vLLM이 노출하는 /metrics를 Prometheus로 긁고 Grafana에 얹는 것이 일반적이다. 다만 무엇을 봐야 하는지는 같다. 초당 토큰 수와 지연, 그리고 KV 캐시 사용률이다.
10. 정리
여덟 단계를 관통하는 숫자는 두 개다. 단일 요청 1.1배, 동시 요청 12.6배.
| 단계 | 확인한 것 | 수치 |
|---|---|---|
| 1 | HuggingFace 베이스라인 | 10.5 tok/s |
| 2 | vLLM 단일 요청 | 11.9 tok/s (1.1x) |
| 3 | 연속 할당의 낭비 | 활용률 20.3% |
| 4 | PagedAttention | 활용률 95.4%, 사용자 4.8x |
| 5 | OpenAI 호환 서버 | /v1/completions |
| 6 | 동시 20명 부하 | 163.4 tok/s (12.6x) |
| 7 | 파라미터 튜닝 | max_num_seqs 8로 줄이자 절반 |
| 8 | 대시보드 | tok/s · 지연 · KV 사용률 |
vLLM의 가치는 요청 하나를 빨리 처리하는 데 있지 않다. 같은 메모리에 더 많은 요청을 담고, 담긴 것들을 한 배치로 묶어 흘리는 데 있다. Task 2에서 실망스러웠던 1.1배와 Task 6의 12.6배는 같은 엔진의 다른 얼굴이다.
그래서 벤치마크를 읽을 때 동시성 조건이 빠진 tok/s 수치는 절반만 말하는 것이다. 어떤 엔진이 “몇 배 빠르다"고 할 때 사용자 1명 기준인지 20명 기준인지에 따라 결론이 뒤집힌다.
CPU 4GB에서도 이 구조는 그대로 관찰된다. GPU에서는 절대 수치가 달라지지만 낭비를 줄여 동시성을 확보한다는 원리는 바뀌지 않는다.